Android Studio - Tutorial Membuat TwoActivities
Assalamualaikun Wr Wb.
Ketemu lagi nih guys setelah kemarin membahas tentang Scrolling nah sekarang kita akan berpindah ketahap selanjutnya, ya selanjutnya kita kan membahas tentang twoactivities, yang mana twoactivities ini menggunakan 2 activity yang berbeda dan menggunakan fungsi intent, intent sendiri berfunsi sebagai penghubung bisa dikatakan juga sebagai hyperlink pada program microsoftnya,
 |
| Two Activities |
- seperti biasa kita membuat lembar kerja yang baru seperti pada tahap pembuatan Hello Toast dan kita berhentikan samapai cara yang ke 5
- salinlah coding di bawah ini ke activity_main.xml
<?xml version="1.0" encoding="utf-8"?>
<RelativeLayout xmlns:android="http://schemas.android.com/apk/res/android"    xmlns:tools="http://schemas.android.com/tools"    android:layout_width="match_parent"    android:layout_height="match_parent"    android:paddingBottom="@dimen/activity_vertical_margin"    android:paddingLeft="@dimen/activity_horizontal_margin"    android:paddingRight="@dimen/activity_horizontal_margin"    android:paddingTop="@dimen/activity_vertical_margin"    tools:context=".MainActivity">
    <TextView        android:id="@+id/text_header_reply"        android:layout_width="wrap_content"        android:layout_height="wrap_content"        android:layout_marginBottom="@dimen/activity_vertical_margin"        android:text="@string/text_header_reply"        android:textAppearance="?android:attr/textAppearanceMedium"        android:textStyle="bold"        android:visibility="invisible" />
    <TextView        android:id="@+id/text_message_reply"        android:layout_width="wrap_content"        android:layout_height="wrap_content"        android:layout_below="@+id/text_header_reply"        android:layout_marginLeft="@dimen/activity_horizontal_margin"        android:layout_marginStart="@dimen/activity_horizontal_margin"        android:textAppearance="?android:attr/textAppearanceMedium"        android:visibility="invisible" />
    <Button        android:id="@+id/button_main"        android:layout_width="wrap_content"        android:layout_height="wrap_content"        android:layout_alignParentBottom="true"        android:layout_alignParentRight="true"        android:layout_alignParentEnd="true"        android:onClick="launchSecondActivity"        android:text="@string/button_main" />
    <EditText        android:id="@+id/editText_main"        android:layout_width="match_parent"        android:layout_height="wrap_content"        android:layout_alignParentBottom="true"        android:layout_toLeftOf="@+id/button_main"        android:layout_toStartOf="@+id/button_main"        android:hint="@string/editText_main" /></RelativeLayout>
- Salinlah Coding Dibawah ini ke MainActiviti.java
package com.example.android.twoactivities;
import android.content.Intent;import android.support.v7.app.AppCompatActivity;import android.os.Bundle;import android.util.Log;import android.view.View;import android.widget.EditText;import android.widget.TextView;
import static android.app.Activity.RESULT_OK;
public class MainActivity extends AppCompatActivity {
    // Class name for Log tag    private static final String LOG_TAG = MainActivity.class.getSimpleName();    // Unique tag required for the intent extra    public static final String EXTRA_MESSAGE =
                                        "com.example.android.twoactivities.extra.MESSAGE";    // Unique tag for the intent reply    public static final int TEXT_REQUEST = 1;
    // EditText view for the message    private EditText mMessageEditText;    // TextView for the reply header    private TextView mReplyHeadTextView;    // TextView for the reply body    private TextView mReplyTextView;
    @Override    protected void onCreate(Bundle savedInstanceState) {
        super.onCreate(savedInstanceState);        setContentView(R.layout.activity_main);
        // Initialize all the view variables.        mMessageEditText = (EditText) findViewById(R.id.editText_main);        mReplyHeadTextView = (TextView) findViewById(R.id.text_header_reply);        mReplyTextView = (TextView) findViewById(R.id.text_message_reply);    }

    public void launchSecondActivity(View view) {
        Log.d(LOG_TAG, "Button clicked!");
        Intent intent = new Intent(this, SecondActivity.class);        String message = mMessageEditText.getText().toString();
        intent.putExtra(EXTRA_MESSAGE, message);        startActivityForResult(intent, TEXT_REQUEST);    }

    @Override    public void onActivityResult(int requestCode, int resultCode, Intent data) {
        super.onActivityResult(requestCode, resultCode, data);
        // Test for the right intent reply        if (requestCode == TEXT_REQUEST) {
            // Test to make sure the intent reply result was good.            if (resultCode == RESULT_OK) {
                String reply = data.getStringExtra(SecondActivity.EXTRA_REPLY);
                // Make the reply head visible.                mReplyHeadTextView.setVisibility(View.VISIBLE);
                // Set the reply and make it visible.                mReplyTextView.setText(reply);                mReplyTextView.setVisibility(View.VISIBLE);            }
        }
    }
}
- buat lah layout baru dengan nama activity_second.xlm dan salinkan code di bawah ini
<?xml version="1.0" encoding="utf-8"?>
<RelativeLayout xmlns:android="http://schemas.android.com/apk/res/android"    xmlns:tools="http://schemas.android.com/tools"    android:layout_width="match_parent"    android:layout_height="match_parent"    android:paddingBottom="@dimen/activity_vertical_margin"    android:paddingLeft="@dimen/activity_horizontal_margin"    android:paddingRight="@dimen/activity_horizontal_margin"    android:paddingTop="@dimen/activity_vertical_margin"    tools:context=".SecondActivity">
    <TextView
        android:id="@+id/text_header"        android:layout_width="wrap_content"        android:layout_height="wrap_content"        android:layout_marginBottom="@dimen/activity_vertical_margin"        android:text="@string/text_header"        android:textAppearance="?android:attr/textAppearanceMedium"        android:textStyle="bold" />

    <TextView
        android:id="@+id/text_message"        android:layout_width="wrap_content"        android:layout_height="wrap_content"        android:layout_below="@+id/text_header"        android:layout_marginLeft="@dimen/activity_horizontal_margin"        android:layout_marginStart="@dimen/activity_horizontal_margin"        android:textAppearance="?android:attr/textAppearanceMedium" />
    <Button        android:id="@+id/button_second"        android:layout_width="wrap_content"        android:layout_height="wrap_content"        android:layout_alignParentBottom="true"        android:layout_alignParentRight="true"        android:layout_alignParentEnd="true"        android:onClick="returnReply"        android:text="@string/button_second" />
    <EditText        android:id="@+id/editText_second"        android:layout_width="match_parent"        android:layout_height="wrap_content"        android:layout_alignParentBottom="true"        android:layout_toLeftOf="@+id/button_second"        android:layout_toStartOf="@id/button_second"        android:hint="@string/editText_second" />    </RelativeLayout>
- tidak sampai disitu kita akan membuat file java yang baru lagi dan kita akan menamainya SecondActivity.java
package com.example.android.twoactivities;
import android.content.Intent;import android.support.v7.app.AppCompatActivity;import android.os.Bundle;import android.view.View;import android.widget.EditText;import android.widget.TextView;
public class SecondActivity extends AppCompatActivity {
    // Unique tag for the intent reply.    public static final String EXTRA_REPLY =
            "com.example.android.twoactivities.extra.REPLY";
    // EditText for the reply.    private EditText mReply;
    @Override    protected void onCreate(Bundle savedInstanceState) {
        super.onCreate(savedInstanceState);        setContentView(R.layout.activity_second);
        // Initialize view variables.        mReply = (EditText) findViewById(R.id.editText_second);
        // Get the intent that launched this activity, and the message in        // the intent extra.        Intent intent = getIntent();        String message = intent.getStringExtra(MainActivity.EXTRA_MESSAGE);
        // Put that message into the text_message TextView        TextView textView = (TextView) findViewById(R.id.text_message);        if (textView != null) {
            textView.setText(message);        }
    }

    public void returnReply(View view) {
        // Get the reply message from the edit text.        String reply = mReply.getText().toString();
        // Create a new intent for the reply, add the reply message to it as an extra,        // set the intent result, and close the activity.        Intent replyIntent = new Intent();        replyIntent.putExtra(EXTRA_REPLY, reply);        setResult(RESULT_OK, replyIntent);        finish();    }
}
sabar bukan berarti coding diatas selesai program langsung jalan, tidak secepat itu hehe. masih ada yang harus di betulkan pada styles.xml dan string.xml dan jangan lupa pada bagian colors.xmlnya
- string.xml
<resources>
<string name="app_name">Two Activities</string>
<string name="activity2_name">Second Activity</string>
<string name="text_header">Message Received</string>
<string name="button_main">Send</string>
<string name="editText_main">Enter Your Message Here</string>
<string name="button_second">Reply</string>
<string name="editText_second">Enter Your Reply Here</string>
<string name="text_header_reply">Reply Received</string>
</resources>
- colors.xml
<?xml version="1.0" encoding="utf-8"?>
<resources>
<color name="colorPrimary">#3F51B5</color>
<color name="colorPrimaryDark">#303F9F</color>
<color name="colorAccent">#FF4081</color></resources>
- Styles.xml
<resources>
    <!-- Base application theme. -->
<style name="AppTheme" parent="Base.Theme.AppCompat.Light.DarkActionBar">
<item name="colorPrimary">@color/colorPrimary</item>
<item name="colorPrimaryDark">@color/colorPrimaryDark</item>
<item name="colorAccent">@color/colorAccent</item>    </style>
</resources>
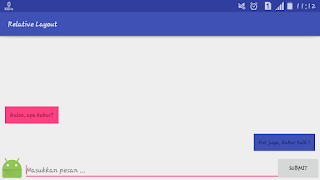
nah baru sekarang kalian boleh merunning program yang tadi kalian buat dan hasilnya seperti ini


selamat mencoba :) dan janganpernah menyerah
jangan bosan-bosan mampir ya


selamat mencoba :) dan janganpernah menyerah
jangan bosan-bosan mampir ya
Wassalamualaikum Wr Wb

Komentar
Posting Komentar